SharePoint: In Defense of Cross-Site Scripting Attacks


Microsoft introduced SharePoint in 2001.  Originally designed as an intranet for team collaboration and content management, SharePoint has evolved with every new version and enterprises have found additional innovative ways to customize it and manage their line of business applications, to some SharePoint is considered a Web Application.
Today we can find several solutions for help desk, wiki sites, blogging, proposal management, resource and project management, emergency response application, to name just a few, which are all based on SharePoint.
The popularity and functionality of Microsoft’s SharePoint continues to increase. In 2009, it generated $1.3 billion in revenues from an installed base of 100+ million users and it has been growing at a rate of 20,000 SharePoint users per day, every day for the last five years and that’s over 7 million new SharePoint users every year. [1]
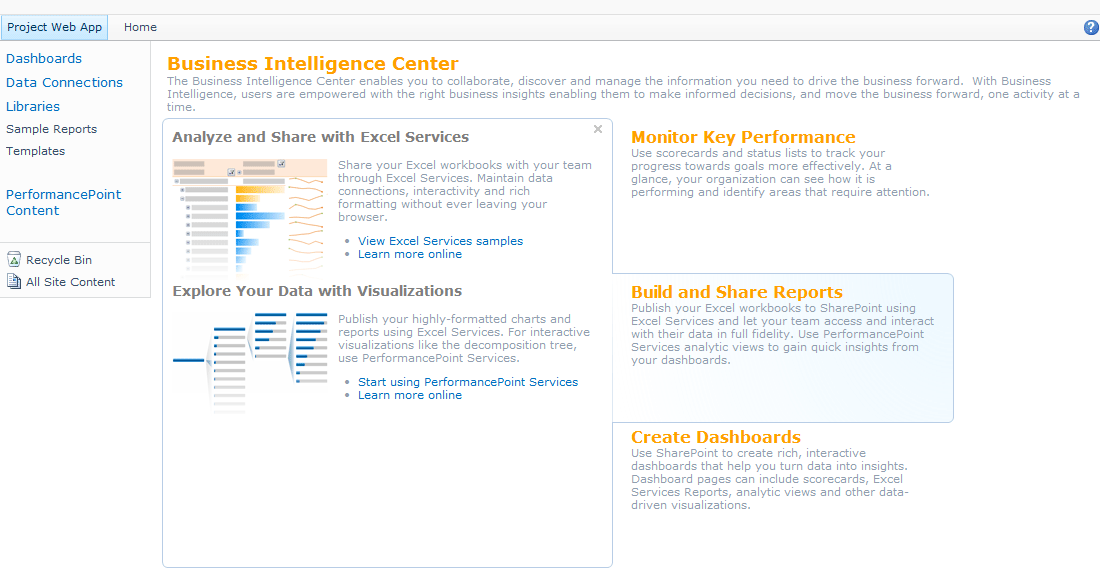
SharePoint 2013
 

Microsoft’s CEO Sever Blamer’s referred to it as “… the definitive OS or platform for the middle tier,..” [2] in his keynote address at the Convergence conference on March 14, 2007, and whether you think of it as a Web OS or simply an Enterprise Information Portal its complexity becomes apparent when you take notice of all the underlying technologies that supports it.

SharePoint is built primarily on Visual C#, Visual Basic, Microsoft .NET Framework, ASP.NET, HTML/CSS, Document Object Model, Silverlight, it interfaces with Microsoft Active Directory, but it can be configured with LDAP, and is designed for use with Microsoft SQL Server and Internet Explorer. Consequently is not without its share of security vulnerabilities.
In fact there has been at nearly 300 vulnerabilities affecting SharePoint and related products over the years many of which have been cross-site scripting allowing remote attackers to inject arbitrary web script or HTML code via crafted JavaScript elements. [3]
One defense mechanism that Microsoft has integrated in SharePoint to protect users against cross-site scripting attacks is the inclusion a form digest for each ASPX web page requested.
The form digest is a security validation specific to a user, site, and time period. It is generated for each HTTP Request and placed on the ASPX page before serving it; it will then get validated on the server side when the user submits the form.
Form Digest embedded in the HTML Form
This mechanism is a feature available to developers who create new Web Pages with just a simple point and click.
Developers have also the option to create their own custom web pages but careful consideration needs to be taken care of to avoid security validation errors, which result in Exceptions errors being thrown out.

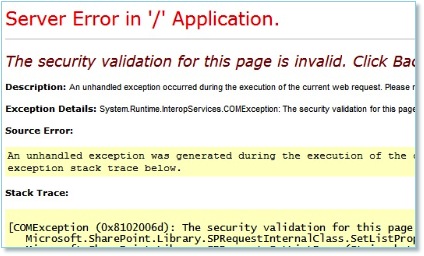
Security Validation Exception Error
The way to correct this is by including the appropriate controls in the ASPX page [4], which will instruct the server to create, include, and manage the form digest
ASPX FormDigest Tag
An SPWeb.ValidateFormDigest or SPUtility.ValidateFormDigest [5] method can then be invoked to explicitly check the security validation used in the ASPX page, and works on a second page on which the first ASPX page posts or on the first one, if there is no second page involved.
This mechanism help developers build their own HTTP POST requests to submit and update SharePoint data, but how can we submit data to the server using HTTP GET requests?
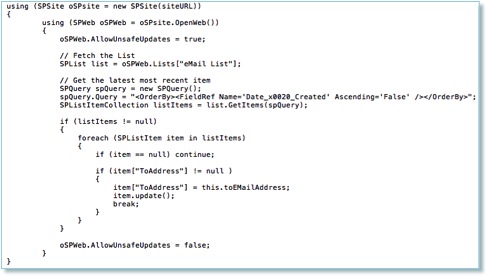
The solution is not without some level of risk. The object model provides developers with a method to instruct the server to bypass the form digest validation by setting the AllowUnsafeUpdates [6] property of the SPSite object to true.
However, setting this property to true opens security risks, potentially introducing cross-site scripting vulnerabilities as noted in the remarks for the class reference, so it must be reset programmatically as soon as the update has taken place.
AllowUnsafeUpdates
Several events can also reset the property and prevent the update to the database [7], [8]:
·      SPRoleDefinitionCollection.BreakInheritance ()
·      BreakRoleInheritance ()
·      ResetRoleInheritance ()
·      An Exception being thrown out
The cross-site scripting protection just described may result in errors if you are writing server-side code not necessarily designed to respond to a POST Request.
If your web pages are designed to respond to a GET Request [9] or if you are creating your own SPSite or SPweb objects using the SharePoint object model and you are required to update the database you must then use the AllowUnsafeUpdate property prior to executing the update.
There are also instances in which you may not be updating the database but instead calling functions, which in turn perform a database update. One such case is the call to EnsureUser () which looks for the specified user login in the Site Users collection and if the login is not found then SharePoint looks to see if it is a valid user in the Active Directory, if it is it then adds the login to the Site Users collection resulting in an update to the database.
In case like this you must also make use of the AllowUnsafeUpdates function and set it to true, but remember to always set it back to false –or at least to its previous state– after the operation is complete, so that other code in your program will not run in unsafe mode.
Many examples I have found on posts on the web, reset it right after line of code executing the database update and sometimes fail to consider exception errors, therefore is always a good idea to reset its value in the finallyblock of a try and catch. [10]


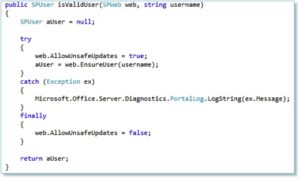
Use of finally block to ensure reset to unsafe updates
References:
For additional
SharePoint or Project Server
related articles please visit my website at:

SharePoint List filter wildcard search on multple columns .. LIKE

This implementation on how to use a SharePoint List filter with a wildcard  on multiple columns is a solution for MOSS 2007 and it requires SharePoint Designer.

The idea here is that given a search string a SharePoint view will then display all records that contains the string value in any of the several columns specified.

So for example if I specify ‘AAA’ as the value for the search string the result set will be Items #1 and  #2 because we can find the ‘AAA’ value in Item  #1 / Column 1  and Item #3 / Column 2

01_multiple_column_sharepoint_list_search

First thing I do is to add a Calculated Column to the list that will contain the concatenation of Colums 1,2, and 3.

multiple_column_search_calculated_column

So now my list looks like:

03_multiple_column_search_calculated_column_view

I then create a web page where the filter and the result set will be displayed.

04_multiple_column_search_webpart_page

I then add a Text String search web part to the newly created page. I have used Choice Fileter and SharePoint List Filter with similar results, but in this example I will use Text String because is the easier to use.

05_multiple_column_search_text_filter

I edit the search web part and give it a name. We’ll need this name latter on in the solution. In this example I will use the ‘Multiple Column Search’ name for the filter as illustrated below.

06_multiple_column_search_text_filter_name

The web part will have a warning note indicating that it is not yet connected to another web part.  We will leave it like this for now and come back to connect it after we’ve edit the web page using SharePoint Designer.

07_multiple_column_search_text_filter_not_connected.gif

Edit this web page using SharePoint designer and notice the SharePoint List in the Task Pane on the right hand side under the Data Source Library tab.  If this tab is not displayed, make sure to check the ‘Data Source Library’ menu option under Task Panes.

08_multiple_column_search_sharepoint_designer.gif

Drag and drop the SharePoint list, in this example ‘My Custom List’ to the web page.

09_multiple_column_search_data_view_tasks.gif

You can edit this view to remove the default columns it has added and add the columns that you wish to display by clicking on the ‘Edit .Columns…’ menu choice in the Common Data View Tasks dialog window.

In this case I will remove the ‘Modified By’ and ‘Modified’ columns that were automatically added and I will instead display the ‘Column #1’, ‘Column #2’ and ‘Column 3’ in addition to the ‘Title’ column already selected for display.

10_multiple_column_search_data_view_columns

I will then click on the ‘Filter’ menu option in the Common Data View Tass dialog window to specify a filter criteria.

11_multiple_column_search_view

Add a new clause In the Filter Criteria dialog window.

12_multiple_column_search_filter_criteria

Select the calculated field that was created in the Field Name prompt and for comparison choose ‘contains’. In the Value promp select Create a New Parameter from the pull down menu.

13_multiple_column_search_filter_criteria_values

The Data View Parameters dialog windows will show up creating a new parameter called ‘Param1’ as the default. Select ‘Form’ for the arameter Source and for the ‘Form Field’ enter the name of the filter web part that we had placed in the web page, in this case ‘Multiple Column Search’

14_multiple_column_search_filter_criteria_parameter

Save the web page in SharePoint Designer and then refersh the browser where the web page was being edited.  The filter web part is now ready to be connected to the SharePoint Data View web part.

From the Connections Menu select ‘Get Parameters From’ and then choose the ‘Multiple Columns Search’ filter.

15_multiple_column_search_connect_webparts

In the Configure Connection dialog window select ‘Param1’ from the pull down menu and click the Finish Button.  Then Finish editing the web page in the browser.

16_multiple_column_search_connect_dialog

The Multiple Column Search filter is now ready to use.  You can type ‘AAA’ in the search value and confirm that only Record #1 and #3 will be dislayed.

17_multiple_column_search

For additional
SharePoint or Project Server
related articles please visit my website at:

Building a single server Project Server 2010 with SQL Server Part 6

Configure SQL Server

In order for the report author to be able to access the Project Server 2010 Reporting database from Microsoft Excel, you must configure Microsoft SQL Server access and add a SQL Server login. The login must enable specific access to the Project Server 2010 Reporting database to gain access to schema information and data. Use the domain group that you created for report viewers (SDREDProjReportAuthors).

To add a login for a report author

  1. Log on to Dev-SQL using the sdredSQLAdmin account. 01-project_server_2010_sql_login
  2. Click Start, All Programs, Microsoft SQL Server 2008, SQL Server Management Studio
  3. On the Connect to Server dialog box, type localhost in the Server name box, and then click Connect.
  4. Expand Security, right-click Logins, and then click New Login. 02-project_server_2010_new_login
  5. On the General page, click Search.
  6. Click Object Types, and select the Groups check box.
  7. Click OK.                                                                        03-project_server_2010_projrepauthors               
  8. Type SDREDProjReportAuthor
  9. Click Check Names.
  10. Click OK.
  11. Select the User Mapping page.
  12. In the Users mapped to this login list, select the row that contains the Project Server 2010 Reporting database (ProjectServer_Reporting).
  13. Select the Map check box for the Project Server 2010 Reporting database.
  14. Select the db_datareader database role membership check box. 04-project_server_2010_user_mapping
  15. Click OK.

Configure Excel Services

Project Server 2010 requires Excel Services in Microsoft SharePoint Server 2010. The first step to configuring Excel Services is to turn on the Excel Calculation Services service.


To turn on the Excel Calculation Services service

  1. On the SharePoint Central Administration Web site, in the System Settings section, click Manage services on server.
  2. In the Service list, click Start next to Excel Calculation Services.

Once the Excel Services service is running, the next step is to create an Excel Services service application.

To create an Excel Services service application

  1. On the SharePoint Central Administration Web site, in the Application Management section, click Manage service applications.
  2. On the Service Applications tab, click New, and then click Excel Services.
  3. In the Name box, type Excel Services Service App.
  4. In the Application pool name box, type ExcelServicesAppPool.
  5. Choose SDREDSVCApp from the Configurable list.
  6. Click OK.

Once Excel Services has been configured, you must configure trusted file locations for the Project Server 2010 Sample Reports and Templates libraries.

Follow this procedure two times: one time for each library.

To configure a trusted file location

  1. In Central Administration, in the Application Management section, click Manage service applications. 05-project_server_2010_system_settings
  2. Click the Excel Services service application. 06-project_server_2010_excel_service_applications
  3. On the Manage Excel Services page, click Trusted File Locations.                                                                                   
  4. Click Add Trusted File Location.        10-project_server_2010_trusted_file_locations
  5. In the Address box, type:

    For the Templates library:

    http://dev2010/pwa/ProjectBICenter/Templates/

    or

    For the Sample Reports library:

    http://dev2010/pwa/ProjectBICenter/Sample%20Reports/ 11-project_server_2010_trusted_file_location

  6. Under Trust Children, confirm that the Children trusted check box is selected.
  7. In the External Data section:
    1. Under Allow External Data, select the Trusted data connection libraries and embedded option.
    2. Under Warn on Refresh, clear the Refresh warning enabled check box.           
12-project_server_2010_trusted_location_configuration

Click OK.

You must configure trusted data connection libraries in order to give users access to the connectors that link the report spreadsheets to the data in the Project Server 2010 Reporting database and OLAP databases. Perform the following procedure to set up the trusted data connection libraries.


To set up trusted data connection libraries

  1. In Central Administration, in the Application Management section, click Manage Service Applications.
  2. Click the Excel Services service application.
  3. Click Trusted Data Connection Libraries.
  4. Click Add Trusted Data Connection Library14-project_server_2010_trusted_data_connection
  5. In the Address box, type:

    http://dev2010/pwa/ProjectBICenter/Data%20Connections%20for%20PerformancePoint/English%20(United%20States)                           15-project_server_2010_data_connection_library

  6. Click OK.

Configure Secure Store

In SharePoint Server 2010, the Secure Store Service enables users to access multiple system resources without having to provide authentication credentials multiple times. SharePoint Server 2010 implements Secure Store Service authentication by including a Windows service and a secure credentials database.

The next step is to configure Secure Store by turning on the Secure Store Service and creating a Secure Store Service service application. Perform the following procedure to turn on the Secure Store Service.

To turn on the Secure Store Service

  1. On the SharePoint Central Administration Web site, in the System Settings section, click Manage services on server.
  2. In the Service list, click Start next to Secure Store Service.    17-project_server_2010_secure_store_service

Once the Secure Store service is running, you must create a Secure Store Service Application. Use the following procedure.

To create a Secure Store Service service application

  1. On the SharePoint Central Administration Web site, in the Application Management section, click Manage service applications.
  2. On the Service Applications tab, click New, and then click Secure Store Service. 19-project_server_2010_secure_store_service
  3. In the Name box, type Secure Store Service Application.   20-project_server_2010_new_secure_store_app
  4. In the Application pool name box, type SecureStoreAppPool.
  5. Choose a managed account from the Configurable list.
  6. Click OK.
  7. When the service application has been successfully created, click OK.

When the Secure Store Service Application has been created, you must generate a Secure Store Service key before the Secure Store service can be used. Perform the following procedure to generate a key.


To generate a Secure Store Service key

  1. On the SharePoint Central Administration Web site, in the Application Management section, click Manage service applications.
  2. Click the Secure Store service application.
  3. On the Edit tab, click Generate New Key. 24-project_server_2010_generate_new_key
  4. Type and confirm a Pass Phrase, and then click OK. 25-project_server_2010_new_key

Once Secure Store is configured, you must create a Secure Store target application.

  26-project_server_2010_new_key_generated
To create a Secure Store target application

  1. On the SharePoint Central Administration Home page, in the Application Management section, click Manage Services Applications.
  2. Click the Secure Store Service.
  3. On the Secure Store Service page, select the Edit tab.
  4. Click New.
  5. On the Create New Secure Store Target Application page:

    1. In the Target Application ID box, type ProjectServerApplication. (Value is case sensitive)
    2. In the Display Name box, type ProjectServerApplication.
    3. In the Contact Email box, type an e-mail address.
    4. From the Target Application Type drop-down list, select Group. 30-project_server_2010_target_application_id
    5. Click Next.
  6. On the Specify the credential fields for your Secure Store Target Application page, click Next.31-project_server_2010_new_secure_store_target_app                                                        
  7. On the Specify the membership settings page:
    1. In the Target Application Administrators box, type SDREDDeveloper. 32-project_server_2010_target_app_admins
    2. In the Members box, type SDREDProjReportViewers.
    3. Click OK.
  8. On the Secure Store Service Application page, select the check box for the target application that you just created.
  9. On the ribbon, click Set Credentials. 33-project_server_2010_set_credentials
  10. On the Set Credentials for Secure Store Target Application (Group) dialog box, type the user name and password of the SDREDProjDataAccess account.  This account must have db_datareader permissions on the Project Server Reporting database. This can be achieved by adding the SDREDProjDataAccess account to the SDREDProjReportAuthors group. 77-project_server_2010_report_viewers
  11. Click OK.

The Project Server 2010 reporting and business intelligence functionality is now configured and ready for use. 59-project_server_2010_business_intelligence_center

61-project_server_2010_sample_reports

For additional
SharePoint or Project Server
related articles please visit my website at:

Creating a PSI Extension for Project Server 2010

This post refers to the Project 2010 SDK Sep 2010 Update.

01-Creating-a-PSI-Extension-for-Project-Server-2010-SDK

This updates contains to sample PSI Extensions.  The ‘Hello World’ and the ‘ListProjects’ examples. Missing from the accompaning documentation is the following:

1) You need to include the System.Web reference not only in the ‘using’ statement but in the list of referenced external libraries.

03-Creating-a-PSI-Extension-for-Project-Server-2010-Reference

2) There is a bug in the GetServiceUri function of the Hello  World PSI extension.  A variable is declared with the name requestUri but referenced as requestUrl (with an L at the end) inside the function.  

02-Creating-a-PSI-Extension-for-Project-Server-2010-Bug

Following the rest of the instructions in the examples was easy including the deployment instructions. However when I tested the web service I got this generic catch all error: ‘Security settings for this service require Windows Authentication but it is not enabled for the IIS application that hosts this service’:

04-Creating-a-PSI-Extension-for-Project-Server-2010-Authentication-Error

After verifying that my development server had indeed Windows Authentication enabled

05-Creating-a-PSI-Extension-for-Project-Server-2010-Windows-Authentication

I then deployed the PSI extension in the Information Worker VHD provided by Microsoft to eliminate the possibility of having mis-configured my development machine, but there I got the same error condition.

After a few hours of research, I learned that while the deployment of Project Server was done using NTLM provider and the web.config was specified as NTLM in the SDK documentation.  I had to change the Providers configuration setting in the web server to include ‘Negotiate’.

06-Creating-a-PSI-Extension-for-Project-Server-2010-Negotiate

With the addition of this Provider setting, an iisreset and an IE clear cache I was able to access the PSI extensions without additional problems.

07-Creating-a-PSI-Extension-for-Project-Server-2010-Web-Service

For additional
SharePoint or Project Server
related articles please visit my website at:
www.gustavogarcia.net

Building a single server Project Server 2010 with SQL Server for use as a development environment. Part 5

Create a PWA site

SharePoint Server 2010 uses a round-robin algorithm to determine the distribution of site collections across content databases. In order to deploy the PWA site to a specific content database, you must lock down any existing content databases in the farm. The process does not affect user access; it only affects the distribution of new site collections.

To lock down your content databases, follow these steps.

To lock down a content database

  1. In the SharePoint Central Administration Web site, in the Application Management section, click Manage content databases.
  2. In the Current Number of Site Collections column, note the number of site collections for the WSS_Content database (this should be 1).         01_project_server2010_number_of_site_collections
  3. In the Database Name column, click the link for the WSS_Content database.
  4. In the Database Capacity Settings section:
    1. In the Maximum number of sites that can be created in this database box, type the existing number of site collections for this database (as noted in the Current Number of Site Collections column, earlier in this procedure).02_project_server2010_lock_down_content_db
    2. In the Number of sites before a Warning event is generated box, type a lower number than the value that is used for Maximum number of sites that can be created in this database.
  5. Click OK.

To create a content database

  1. In SharePoint Central Administration, in the Application Management section, click Manage content databases.
  2. Click Add a content database.
  3. In the Database Name section, type PWA_Content.    
  4. Click OK.         03_project_server2010_pwa_content_db

Once the content database has been created and configured, the next step is to create the PWA site itself.

To create a PWA site

  1. In the SharePoint Central Administration Web site, in the Application Management section, click Manage service applications.
  2. On the Manage Service Applications page, click the Project Server Service Application.
  3. On the Manage Project Web App Sites page, click Create Project Web App Site.
  4. Keep the default values, and then click OK.       05_project_server2010_create_pwa

Project Server 2010 starts the PWA site creation process. This may take some time. When the site creation process is complete, the status shown on the PWA site list is Provisioned.
06_project_server2010_pwa_provisioning
Once the PWA site is provisioned, you can access it using the URL http://dev2010/pwa.

11_project_server2010_access_pwa

Once the PWA site has been provisioned, verify that it was created in the PWA_Content database. Use the Get-SPSite Windows PowerShell command, passing the new content database as a parameter:

To verify the PWA site location

  1. On the Start menu, click All Programs.
  2. Click Microsoft SharePoint 2010 Products.
  3. Click SharePoint 2010 Management Shell.
  4. From the Windows PowerShell command prompt (that is, PS C:>), type the following command and then press ENTER:

    Get-SPSite -ContentDatabase <ContentDatabaseName>

    The command should return the URL for your PWA site and no other URLs.

07_project_server2010_verify_content_db

Once the PWA site is in the PWA_Content database, you must lock down the database to prevent SharePoint Server 2010 from adding additional site collections to the database. This is performed by configuring the maximum number of sites for the content database to one.


To lock down the content database

  1. In SharePoint Central Administration, in the Application Management section, click Manage content databases.     08_project_server2010_lockdown_pwa
  2. In the Database Name column, click the link for the PWA_Content database.
  3. In the Database Capacity Settings section:

    1. In the Number of sites before a Warning event is generated box, type 0.
    2. In the Maximum number of sites that can be created in this database box, type 1.09_project_server2010_lockdown_parameters
  4. Click OK.

Once you have locked down your PWA content database, you can return the WSS_Content database to its original values for Maximum number of sites that can be created in this database (15000) and Number of sites before a Warning event is generated (9000).

You can now access the new PWA site.

Configuring server settings

Each time that you create a PWA site, there are two additional configuration steps that you must take before you start to use Project Server 2010:

  • Create time reporting periods
  • Set the workflow proxy user account

Configuring time reporting periods is required for Team Member use of Time Tracking and Task Statusing within Project Server 2010. Use the following procedure to create time reporting periods.

To create time reporting periods

  1. On the Project Web App site, click Server Settings.
  2. In the Time and Task Management section, click Time Reporting Periods.                                                                                                  12_project_server2010_time_reporting_periods              
  3. On the Time Reporting Periods page:

13_project_server2010_configure_time_reporting_periods

    1. Click the calendar button next to Date the first period starts and select a start date for the first time reporting period.
    2. Click Create Bulk.
    3. Click Save.

The final step before you start to use the Project Web App site is to set the workflow proxy user account. By default, this account is set to the account that you used to create the PWA site. Although you can keep the default, we recommend that you use an account that was created for that purpose. In this case, we will use the sdredDevWFProxy account. Note that you must change the account before you start any workflows or else in-progress workflows will break.

There are two steps that you must follow to set up the workflow proxy account:

  • Create a Project Server 2010 user account for the sdredDevWFProxy account
  • Configure the sdredDevWFProxy account as the workflow proxy user

Perform the following procedure to create a Project Server 2010 for the sdredDevWFProxy account.

To create a user

  1. In Project Web App, click Server Settings.
  2. In the Security section, click Manage Users.                                                                                                                                                      
  3. On the Manage Users page, click New User.                                                                                                                                                        16_project_server2010_add_new_user
  4. On the New User page:

    1. Clear the User can be assigned as a resource check box.
    2. In the Display Name box, type Workflow Proxy User.
    3. In the User Authentication section, type sdredDevWFProxy in the User logon account box.                                                                      17_project_server2010_new_user_category
    4. Select the Prevent Active Directory synchronization for this user check box.
    5. In the Security Categories area, select My Organization in Available Categories, and then click Add.  
    6. Under Permissions for My Organization, select Allow for the following permissions:
      • Open Project
      • Save Project to Project Server
      • View Enterprise Resource Data                                                                                                                                                     18_project_server2010_new_user_global_permission
    7. Under Global Permissions, select Allow for the following permissions:
      • Log On
      • Manage Users and Groups
      • Manage Workflow and Project Detail Pages                                                                                                                                    19_project_server2010_new_user_created
  5. Click Save.

Once the user account is created, you can set the workflow proxy user account. Perform the following procedure to configure the workflow proxy user account.

To set the workflow proxy user account

  1. In PWA, click Server Settings.
  2. On the Server Settings page, under Workflow and Project Detail Pages, click Project Workflow Settings.
  3. On the Project Workflow Settings page, in the Workflow Proxy User account box, type sdredDevWFProxy, and then click Save

20_project_server2010_set_workflow_user_account

For additional 
SharePoint or Project Server 
related articles please visit my website at:

Building a single server Project Server 2010 with SQL Server Part 4

Install Project Server

Before installing project server 2010 create the following domain and local accounts:

Account Domain account Description
SQL Server Administrator SDREDSQLAdmin Administrator account for SQL Server 2008. Local Administrator on the SQL server.
Farm Administrator SDREDDevFarmAdmin Farm Administrator for the Project Server 2010 farm. Local Administrator on web server.
Service application account SDREDDevSVCApp Domain account for running SharePoint Server 2010 service applications.
Workflow proxy account SDREDDevWFProxy Domain account for running Project Server 2010 workflows.
Reporting data access account SDREDDevProjDataAccess Domain account that has access to the reporting database for use with Secure Store as part of Project Server 2010 reporting.

Create the following doamain groups. These groups will be used when configuring reporting for Project Server 2010.

Group Domain group Description
Report Authors SDREDDevProjReportAuthors Active Directory group for report authors.
Report Viewers SDREDDevProjReportViewers Active Directory group for report viewers.

To install Project Server

  1. On the Project Server 2010 DVD, run default.hta. The Setup menu opens.
    01_project_server2010_autoplay
  2. On the Start page, click Install Project Server. It is not necessary to Install the software prerequisites if SharePoint 2010 was recently installed, since they are the same.02_project_server2010_splash_screen
  3. On the Enter your Product Key page, type your product key, and then click Continue.03_project_server2010_key
  4. On the End User License Agreement page, review the terms of the agreement. To accept the agreement, select the I accept the terms of this agreement check box.
    04_project_server2010_license
  5. Click Continue.
  6. On the Choose a file location page, click Install Now.05_project_server2010_file_location
  7. When the installation is complete, select the Run the SharePoint Products and Technologies Configuration Wizard now check box.06_project_server2010_configuration_wizard
  8. Click Close.
  9. On the Welcome to SharePoint Products page, click Next.07_project_server2010_welcome_screen
  10. On the warning dialog box, click Yes.08_project_server2010_iisreset_warning
  11. On the Completing the SharePoint Products Configuration Wizard page, click Next.
    10_project_server2010_configuring_process
    11_project_server2010_configuration_successful
  12. When the wizard is finished, click Finish.

Once the wizard has finished the browser will launched and display prompting to choose between launching the wizard to configure the farm or cancel to configure at a latter time. Choose cancel so that we can configure using our own selections. 12_project_server2010_configure_farm
Before configuring the Farm we will first need to register our Managed Accounts.

Configure a managed account

Before you can use a domain account within SharePoint Server 2010, you must register it as a managed account. The SDREDDevSVCApp account will be used to run the various service applications in this Project Server 2010. Perform the following procedure to register the SDREDDevSVCApp account as a managed account.

To register a managed account

  1. In SharePoint Central Administration, click Security.13_project_server2010_security_tab
  2. Under General Security, click Configure managed accounts.14_project_server2010_managed_accounts
  3. On the Managed Accounts page, click Register Managed Accounts.
  4. On the Register Managed Account page:


  • In the User name box, type SDREDDEVSVCApp.

  • In the Password box, type the password for the SDREDDEVSVCApp account.

  • Click OK.

    Configure services and service applications

    The first step is to start the Project Application Service and the PerformancePoint Service on Dev2010.To start the Project Application Service

    1. On the SharePoint Central Administration home page, in the System Settings section, click Manage services on server.
    2. On the Service list, click Start next to Project Application Service.
    3. On the Service list, click Start next to PerformancePoint Service.

    16_project_server2010_farm_services
    Once you have started the Project Application Service and PerformancePoint Service, you must create a service application for each service.

    To create a Project Server service application

    1. On the Central Administration home page, in the Application Management section, click Manage service applications.
    2. On the Manage Service Applications page, on the ribbon, click New, and then click Project Server Service Application.
    3. On the Create Project Web App service application page:17_project_server2010_project_server_app


    • In the Project Web App service application name box, type Project Server Service App.
    • In the Application Pool section, select the Create new application pool option, and in the Application pool name box, type ProjectAppPool.
    • Select the Configurable option, and select the SDREDDevSVCApp account from the drop-down list.
    • Click OK.

    1. To create a PerformancePoint service application
    • On the Central Administration home page, in the Application Management section, click Manage service applications.
    • On the Manage Service Applications page, on the ribbon, click New, and then click PerformancePoint Service Application.
    • On the New PerformancePoint Service Application page:18_project_server2010_performance_point
    • In the Name box, type PerformancePoint Service Application.
    • Select the Add this service application’s proxy to the farm’s default proxy list check box.
    • In the Application Pool area, select the Create new application pool option, and in the Application pool name box, type PerformancePointAppPool.
    • Select the Configurable option, and select the SDREDDEVSVCApp account from the drop-down list.
    • Click Create.When the service application has been successfully created, click OK.

    Configure the top-level Web site

    A Web application is required to host the Project Web App web site and the associated project sites. Perform the following procedure to create a Web application.

    To create a Web application

    1. In Central Administration, in the Application Management section, click Manage Web applications.
    2. On the toolbar, click New.
    3. On the Create New Web Application page, keep the default values, and then click OK.19_project_server2010_create_web_app
    4. When the Web application has been created, click OK.

    The next step is to create a top-level Web site and give users read permission to that site.

    To create a top-level Web site

    1. In Central Administration, in the Application Management section, click Create site collections.20_project_server2010_site_collection
    2. Type PWA in the Title box.
    3. In the Primary Site Collection Administrator section, type FarmAdmin.
    4. Click OK.

    To set Read permissions on the top-level Web site

    1. Navigate to the root site (http://dev2010/pwa).
    2. Click Site Actions.
    3. Click Site Permissions.
    21_project_server_2010_top_level_site
    22_project_server_2010_grant_permissions
    In the Users/Groups box, type NT AUTHORITYAuthenticated Users.
    1. Under Give Permission, select Visitors [Read].
    2. Click OK.


    For additional 
    SharePoint or Project Server 
    related articles please visit my website at:

    Adding Project Server to the Information Worker Demo VM

    To add Project Server to the Information Worker Demo VM look for the Microsoft Project 2010 Demonstration and Evaluation Installation Pack in the Microsoft Download Center.

    Before installing the software pack make sure that the DNS entries match the setup for your network.  If you are using the Host Only setting then there is no need to make additional settings. In my case I setup the type of Network to Bridged Only and assigned it a different static IP address.

    The IP that the VM comes with is 192.168.150.1.

    01contoso_ip_settings

    The forward and reverse lookup entries will need to be updated.

    02contoso_dns_entries

    03contoso_dns_gc_entries

    Mount the software package image and double clik on the Run command in the AutoPlay window.

    05run_the-demo_pack

    In the Welcome Screen click the install button.

    06project2010_demo_pack_welcome

    The installer will first extract the installation files.

    07project2010_demo_pack_installer_pack


    In my case I had not updated the DNS entries for the VM and therefore it could not connect to the newly created PWA.

    08project2010_demo_pack_install_progress

    I then  updated the DNS gc entries.

    09project2010_demo_pack_gc_modified

    I updated the forward and reverse lookup zone entires.

    11project2010_demo_pack_reverse_lookup_zones

    I ran the installation wizard once again and with the correct DNS entries the installation did not generate any errors.

    12project2010_demo_pack_install_complete

    After the installation is complete point your browser to project.contoso.com/PWA and the PWA 2010 will display.

    13project2010_demo_pack_pwa_page

    For additional 
    SharePoint or Project Server 
    related articles please visit my website at:


    Building a single server Project Server 2010 with SQL Server for use as a development environment. Part 3

    Run the SharePoint Products Configuration Wizard

    Use the following procedure to install and configure the configuration database and the content database, and install the SharePoint Central Administration Web site.

    To run the SharePoint Products Configuration Wizard

    1.On the Welcome to SharePoint Products page, click Next.

    01_sharepoint_2010_run_wizard.gif

    2.In the dialog box that notifies you that some services might need to be restarted during configuration, click Yes.

    03_sharepoint_2010_iisreset_warning

    3.On the Connect to a server farm page, click Create a new server farm, and then click Next.

    04_sharepoint_2010_server_farm

    4.On the Specify Configuration Database Settings page, do the following:

                         In the Database server box, type the name of the computer that is running SQL Server.


                         In the Database name box, type a name for your configuration database or use the default database name. The default name is SharePoint_Config.


                         In the Username box, type the user name of the server farm account. Ensure that you type the user name in the format DOMAINuser name.


    05_sharepoint_2010_config_db_settings

    Note: The server farm account is used to create and access your configuration database. It also acts as the application pool identity account for the SharePoint Central Administration application pool, and it is the account under which the Microsoft SharePoint Foundation Workflow Timer service runs. The SharePoint Products Configuration Wizard adds this account to the SQL Server Login accounts, the SQL Server dbcreator server role, and the SQL Server securityadmin server role. The user account that you specify as the service account must be a domain user account, but it does not need to be a member of any specific security group on your front-end Web servers or your database servers. We recommend that you follow the principle of least privilege and specify a user account that is not a member of the Administrators group on your front-end Web servers or your database servers.

                         In the Password box, type the user password.


    5.Click Next.

    6.On the Specify Farm Security Settings page, type a passphrase, and then click Next.
Ensure that the passphrase meets the following criteria:

    06_sharepoint_2010_farm_security_settings

    7.On the Configure SharePoint Central Administration Web Application page, do the following:

                         Either select the Specify port number check box and type the port number you want the SharePoint Central Administration Web application to use, or leave the Specify port number check box cleared if you want to use the default port number.


                         Click either NTLM or Negotiate (Kerberos).


    07_sharepoint_2010_ca_configuration

    8.Click Next.

    9.On the Completing the SharePoint Products Configuration Wizard page, review your configuration settings to verify that they are correct, and then click Next.

    08_sharepoint_2010_completing

    09_sharepoint_2010_configuring_process

    10_sharepoint_2010_configuration_successful

    13.         On the Configuration Successful page, click Finish.

    Note: If the SharePoint Products Configuration Wizard fails, check the PSCDiagnostics log files, which are located on the drive on which SharePoint Server is installed, in the %COMMONPROGRAMFILES%Microsoft SharedWeb Server Extensions14LOGS folder.

    Configure browser settings

    After you run the SharePoint Products Configuration Wizard, you should ensure that SharePoint Server works properly for local administrators in your environment by configuring additional settings in Internet Explorer.

    If you are prompted for your user name and password, perform the following procedures:

       Add the SharePoint Central Administration Web site to the list of trusted sites


       Disable Internet Explorer Enhanced Security settings


       Configure Proxy Settings

    To add the Central Administration Web site to the list of trusted sites

    1.In Internet Explorer, on the Tools menu, click Internet Options.

    2.On the Security tab, in the Select a zone to view or change security settings area, click Trusted Sites, and then click Sites.

    12_sharepoint_2010_ie_trusted_sites

    3.Clear the Require server verification (https:) for all sites in this zone check box.

    4.In the Add this Web site to the zone box, type the URL to your site, and then click Add.

    5.Click Close to close the Trusted Sites dialog box.

    6.Click OK to close the Internet Options dialog box.

    To disable Internet Explorer Enhanced Security settings

    1.Click Start, point to All Programs, point to Administrative Tools, and then click Server Manager.

    2.In Server Manager, select the root of Server Manager.

    3.In the Security Information section, click Configure IE ESC.
The Internet Explorer Enhanced Security Configuration dialog box opens.

    13_sharepoint_2010_ie_trusted_sites

    4.In the Administrators section, click Off to disable the Internet Explorer Enhanced Security settings, and then click OK.

    To configure proxy server settings to bypass the proxy server for local addresses

    1.In Internet Explorer, on the Tools menu, click Internet Options.

    2.On the Connections tab, in the Local Area Network (LAN) settings area, click LAN Settings.

    3.In the Automatic configuration area, clear the Automatically detect settings check box.

    4.In the Proxy Server area, select the Use a proxy server for your LAN check box.

    5.Type the address of the proxy server in the Address box.

    6.Type the port number of the proxy server in the Port box.

    7.Select the Bypass proxy server for local addresses check box.

    8.Click OK to close the Local Area Network (LAN) Settings dialog box.

    9.Click OK to close the Internet Options dialog box.

    Run the Farm Configuration Wizard

    You have now completed Setup and the initial configuration of SharePoint Server 2010. You have created the SharePoint Central Administration Web site. You can now create your farm and sites, and you can select services by using the Farm Configuration Wizard.

    To run the Farm Configuration Wizard

    1.On the SharePoint Central Administration Home page, under Quick Launch, click Configuration Wizards, and then click Launch the Farm Configuration Wizard.

    2.On the Help Make SharePoint Better page, click one of the following options, and then click OK:

    14_sharepoint_2010_configure_farm

                         Yes, I am willing to participate (Recommended.)

                         No, I don’t want to participate.

    3.On the Configure your SharePoint farm page, click Walk me through the settings using this wizard, and then click Next.

    4.On the Configure your SharePoint farm page, in the Service Account section, click the service account option that you want to use to configure your services.

    16_sharepoint_2010_configure_service_accts

      Note: For security reasons, we recommend that you use a different account from the farm administrator account to configure services in the farm.
If you decide to use an existing managed account — that is, an account that SharePoint Server is aware of — ensure that you click that option before you continue

    8.Select the services that you want to use in the farm, and then click Next.

    15_sharepoint_2010_configure_services_1

    12.         On the Create Site Collection page, do the following:

                         In the Title and Description section, in the Title box, type the name of your new site.


                         Optional: In the Description box, type a description of what the site contains.


                         In the Web Site Address section, select a URL path for the site.


                         In the Template Selection section, in the Select a template list, select the template that you want to use for the top-level site in the site collection.


    18_sharepoint_2010_create_collection_site   

    13.         Click OK.

    14.         On the Configure your SharePoint farm page, review the summary of the farm configuration, and then click Finish.

    Building a single server Project Server 2010 with SQL Server for use as a development environment. Part 2

    Install SharePoint Server 2010

    To install and configure SharePoint Server 2010, follow these steps:
    1.Run the Microsoft SharePoint Products Preparation Tool, which installs all required prerequisites to use SharePoint Server.
    2.Run Setup, which installs binaries, configures security permissions, and edits registry settings for SharePoint Server 2010.
    3.Run SharePoint Products Configuration Wizard, which installs and configures the configuration database, the content database, and installs the SharePoint Central Administration Web site.
    4.Configure browser settings.
    5.Run the Farm Configuration Wizard, which configures the farm, creates the first site collection, and selects the services that you want to use in the farm.
    6.Perform post-installation steps.
    Important:
    ·       To complete the following procedures, you must be a member of the Administrators group on the local computer.
    ·       Because the prerequisite installer downloads components from the Microsoft Download Center, you must have Internet access on the computer on which you are installing SharePoint Server.
    Run the Microsoft SharePoint Products Preparation Tool
    Use the following procedure to install software prerequisites for SharePoint Server 2010.
    To run the Microsoft SharePoint Products Preparation Tool
    1.Insert your SharePoint Server 2010 installation disc.
    sharepoint_2010_autoplay.gif
    2.On the SharePoint Server 2010 Start page, click Install software prerequisite
    sharepoint_2010_splash_page.gif
    3.On the Welcome to the Microsoft SharePoint Products Preparation Tool page, click Next.
    sharepoint_2010_welcome_screen.gif
    4.On the License Terms for software product page, review the terms, select the I accept the terms of the License Agreement(s) check box, and then click Next.
    sharepoint_2010_license_terms.gif
    5.On the Installation Complete page, click Finish.
    sharepoint_2010_installation_complete.gif
    Run Setup
    The following procedure installs binaries, configures security permissions, and edits registry settings for SharePoint Server 2010. At the end of Setup, you can choose to start the SharePoint Products Configuration Wizard, which is described later in this section.
    To run Setup
    1.On the SharePoint Server 2010 Start page, click Install SharePoint Server.
    sharepoint_2010_splash_page 2.gif
    2.On the Enter Your Product Key page, enter your product key, and then click Continue.

    image012.png
    3.On the Read the Microsoft Software License Terms page, review the terms, select the I accept the terms of this agreement check box, and then click Continue.

    sharepoint_2010_license_terms 2.gif
    4.On the Choose the installation you want page, click Server farm.
    sharepoint_2010_server_farm.gif
    5.On the Server Type tab, click Complete.
    sharepoint_2010_server_type
    6.Optional: To install SharePoint Server 2010 at a custom location, click the File Location tab, and then either type the location or click Browse to find the location.
    sharepoint_2010_files_location.gif
    7.Click Install Now.
    sharepoint_2010_installation_progress.gif
    8.When Setup finishes, a dialog box prompts you to complete the configuration of your server. Ensure that the Run the SharePoint Products and Technologies Configuration Wizard now check box is selected.
    sharepoint_2010_run_wizard.gif
    9.Click Close to start the configuration wizard.
    Note: check log files in the Temp folder of the user who ran Setup. Ensure that you are logged in as the user who ran Setup, and then type %temp% in the location bar in Windows Explorer. If the path in Windows Explorer resolves to a location that ends in a “1” or “2”, you will need to navigate up one level to view the log files. The log file name is SharePoint Server Setup (<timestamp>).

    Building a single server Project Server 2010 with SQL Server for use as a development environment. Part 1

    Part 1 Setting up SQL Server for a Project Server 2010
    This article describes how to install and configure Microsoft SQL Server 2008 R2 for use with Project Server 2010. Project Server 2010 requires one of the following versions of SQL Server:
       Microsoft SQL Server 2008 with Service Pack 1 (SP1) and Cumulative Update 2
       Microsoft SQL Server 2008 R2

       Microsoft SQL Server 2005 SP3 with Cumulative update package 3 for SQL Server 2005 Service Pack 3

    This article describes installing and configuring SQL Server 2008 R2. 

    Configure a local administrator
    It is recommended to install SQL Server 2008 R2 while logged on with the SQL Server administrator domain account (SDREDDeveloper). Prior to doing this, you must add this account to the local Administrators group on the virtual machine.
    Log on to the virtual machine with the domain administrator account (SDREDAdministrator) and perform the following procedure to add the SDREDDeveloper account to the local Administrators group.
    To add a local administrator
    1.Log on to the virtual machine where you want to install SQL Server as a domain administrator.
    2.Click Start, click Administrative tools, and then click Computer Management.
    3.Expand Local Users and Groups, and then click Groups.
    4.In the right pane, right-click Administrators, and then click Properties.
    5.Click Add.
    6.Type the name of the SQL Server administrator account (SDREDDeveloper), and then click OK.
    7.Click OK.
    8.Log off the virtual machine.
    To perform the remaining procedures in this article, log on to virtual machine with the SDREDDeveloper account.
    Install SQL Server 2008
    Perform the following procedure to install SQL Server 2008 R2 on the virtual machine.
    To install SQL Server 2008
    1.Attach the SQL Server 2008 R2 DVD or image file to the virtual machine DVD drive.
    2.Log on to the virtual machine where you want to install SQL Server as the SQL Server administrator.
    3.On the SQL Server DVD, double-click setup.exe
    sql_server_2008_r2_autoplay
    4. The first step is to install SQL Server 2008 R2. SQL Server 2008 R2 requires the NET Framework version 3.5. If the .NET Framework 3.5 is currently not installed, you must install it or enable it as a feature in Windows Server 2008 before you continue.
    sql_server_2008_r2_setup_dotnet
    5.If a compatibility warning is displayed, click Run program.
    6. In the SQL Server Installation Center, in the left pane, click Installation.
    sql_server_2008_r2_installation_center
    7.In the right pane, click New SQL Server stand-alone installation or add features to an existing installation.
    8.If a compatibility warning is displayed, click Run program.
    9.On the Setup Support Rules page, click OK.
    sql_server_2008_r2_setup_support_rules
    10.         On the Product Key page, type your product key, and then click Next.
    sql_server_2008_r2_product_key
    11.         On the License Terms page, review the license agreement and, if you agree, select the I accept the license terms check box, and then click Next.
    sql_server_2008_r2_license_terms
    12.         On the Setup Support Files page, click Install.
    sql_server_2008_r2_setup_support_files
    13.         On the Setup Support Rules page, click Next.
    sql_server_2008_r2_setup_support_rules2
    14.         On the Setup Role click on the SQL Server Feature Installation.
    sql_server_2008_r2_setup_role
    15.         On the Feature Selection page, select the following check boxes:
                         Database Engine Services
                         Analysis Services
                         Reporting Services
                         Management Tools – Complete
    sql_server_2008_r2_feature_selection
    16.         Click Next.
    17.         On the Installation Rules Click Next.
    sql_server_2008_r2_installation_rules
    18.         On the Instance Configuration page, leave the Default instance option selected or name your own instance, and then click Next. (Because this development VM will be supporting various production environments I prefer to have an instance for each production environment I’ll be supporting)
    sql_server_2008_r2_instance_configuration
    19.         On the Disk Space Requirements page, click Next.
    sql_server_2008_r2_disk_space_requirements
    20.         On the Database Engine Configuration page, select the Mixed Mode option, and type and confirm a password for the built-in SQL Server administrator account.
    sql_server_2008_r2_database_engine_configuration
    21.         Click Add Current User to add the current user account as a SQL Server administrator.
    22.         On the Data Directories Tab, enter the database directories or leave the defaults
    sql_server_2008_r2_database_engine_configuration_directories
    23.         Click Next.
    24.         On the Analysis Services Configuration page, click Add Current User to add the current user account as an Analysis Services administrator.
    sql_server_2008_r2_analysis_services_configuration
    25.         Click Next.
    26.         On the Reporting Services Configuration page, select the Install the SharePoint integrated mode default configuration option, and then click Next.
    sql_server_2008_r2_reporting_services_configuration
    27.         On the Error and Usage Reporting page, leave the default values and then click Next.
    sql_server_2008_r2_error_reporting
    28.         On the Installation Rules page, click Next.
    sql_server_2008_r2_installation_rules
    29.         On the Ready to Install page, click Install.
    sql_server_2008_r2_ready_to_install
    30.         When the setup process is complete, click Next.
    On the Complete page, click Close.
    sql_server_2008_r2_complete